
Ever stumbled upon a zombie villager shuffling around your Minecraft survival servers and wondered, "Hey, could I fix that"? Well, you absolutely can – and trust me, you'll want to!
While regular villagers are already trading goldmines, a newly cured villager is your ticket to unbeatable deals.
These grateful reformed zombies will practically give away their goods with massive discounts. OK, the curing process takes a bit of effort, but when you're getting top-tier loot at bargain-basement prices, who wouldn't go the extra mile for deals like these?
Our simple guide covers all the mechanics of curing a zombie villager in Minecraft. We have tested it on the best Minecraft 1.20 servers, guaranteeing an up-to-date and error-free tutorial.
Ready to become the miracle worker these green-skinned traders have been waiting for? Discover the art of zombie villager rehabilitation.
✨ What You'll Learn
- Turn zombie villagers back into regular traders (with amazing discounts)
- Craft all the essential curing items from basic materials
- Create potions of weakness step-by-step
- Safely trap and cure zombies without risking your village
⏱️ Time needed: 15-20 minutes to learn everything
🧟♂️ Difficulty: Medium - but totally worth it!
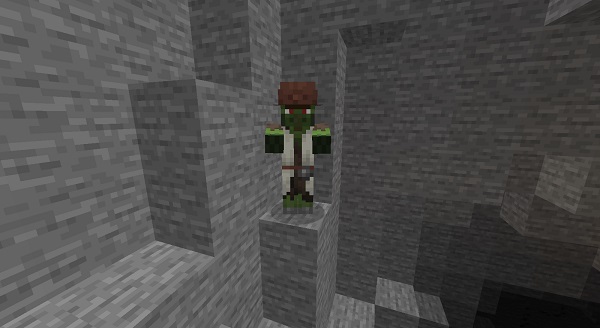
What is a Zombie Villager in Minecraft?

Picture a normal villager who's had a really, really bad day. That's essentially what a zombie villager is – an undead version of our friendly trading partners, complete with their distinctive profession-based outfits.
But instead of offering you sweet deals on emeralds, these variants are more interested in making you their next meal!
You might spot naturally spawned zombie villagers lurking in the darkness or witness the unfortunate transformation when zombies attack normal villagers in their villages.
What makes things even more interesting is that, like their living counterparts, zombies come in all shapes and sizes—even as tiny, fast-moving baby zombie villagers.
While they share the same strength and behavior as regular zombies, their villager origins make them uniquely valuable.
Why? Because with the right tools and a bit of patience, these shambling traders-turned-monsters can be restored to their former glory – and they'll be extremely grateful for the cure.
Materials Required For Curing A Zombie Villager
You need the following items to turn a zombie villager back into a regular villager in Minecraft:
- Zombie Villager
- Splash Potion of Weakness
- Brewing Stand
- Fermented Spider Eye
- Bottle of Water
- Gunpowder
- Blaze Powder
- Golden Apple
The rarest item you need while curing a zombie villager is a golden apple. To obtain it naturally, you have to explore mineshafts, dungeons, and the Woodland Mansion. If that sounds tiresome, you can also combine 8 gold ingots with a regular apple to turn it into a golden apple.
Even though its recipe is not cheap, you can't skip the golden apple if you want to cure a zombie villager in Minecraft.
How to Make Splash Potion of Weakness
To make a zombie villager ready for the cure, you first need to target its undead nature. A Splash Potion of Weakness will transform your aggressive foe into a weakened zombie villager.
Once they're in this vulnerable state, they're actually capable of accepting the cure. Pretty clever, right?
So, let's figure out how to brew this potion in no time:
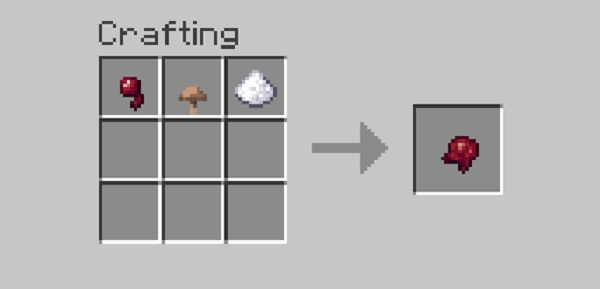
1. First, combine a brown mushroom with sugar and a spider eye to create a fermented spider eye. It has the power to corrupt everything it gets added to.
2. Next, create a brewing stand with the help of one blaze rod with three blocks of cobblestone.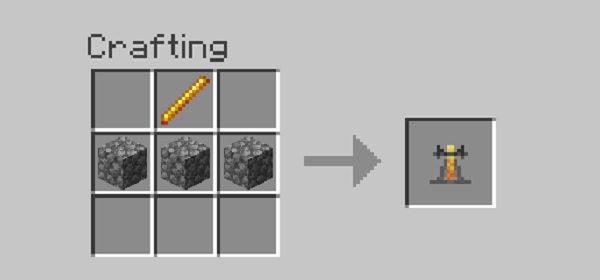
3. Then, place a bottle of water at the bottom cell of the Brewing Stand and the blaze powder in the left-side fuel cell. The powder will immediately turn into fuel.
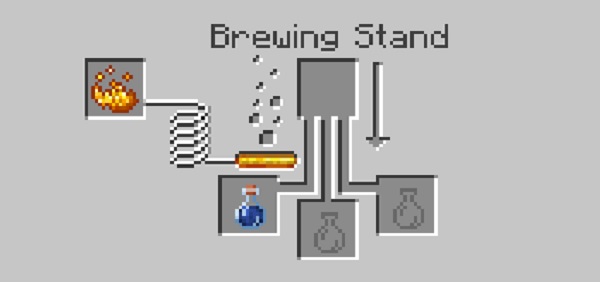
4. After that, place a fermented spider eye in the top cell of the brewing stand in Minecraft. It will slowly brew the bottle of water into a Potion of Weakness.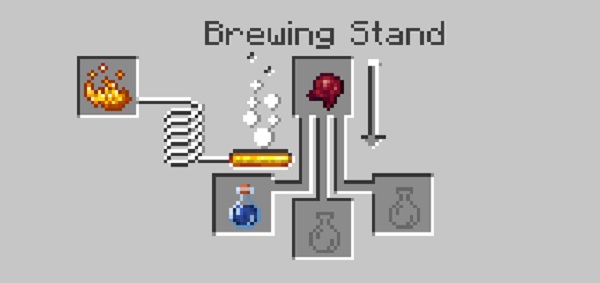
5. Once the potion is ready, you need to make it throwable. To do that, simply brew a piece of gunpowder with the potion bottle. Within seconds, you will have your splash potion of weakness ready.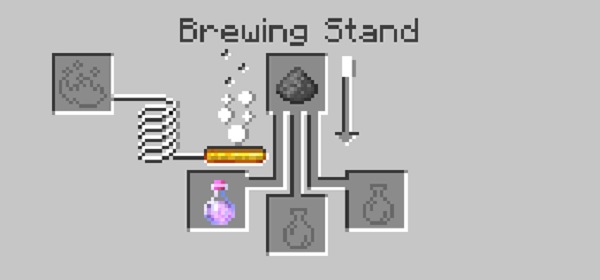
How to Cure a Zombie Villager
Curing a zombie villager in Minecraft requires precision and planning - this isn't the time for winging it. One wrong move and your whole village can turn into zombies.
Find and Trap a Zombie Villager
Before you convert a zombie villager, you need to find and trap one. Here's how to do it safely:
1. First, go to a village and wait for a zombie villager to spawn at night. If you don't find one naturally, you can lure a zombie into attacking a villager too. At hard difficulty, villagers always turn into zombies when attacked by them.
2. Then, dig a three-block deep hole and place a trap door on top of it. You can make the hole opening large to make it easier to use.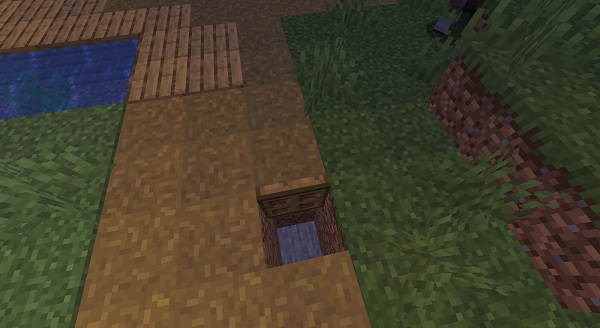
3. Then, make the zombie villager follow you around and get it to fall into the hole. The best way to go about it is by waiting next to the hole and opening the trapdoor as soon as the zombie walks over it.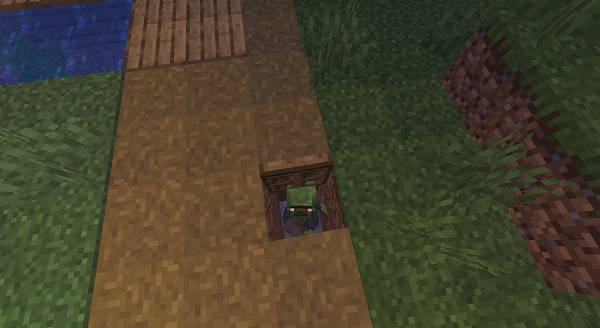
4. Alternatively, you can also try and trap a zombie villager inside a village hut. This is often the case when you make a zombie attack a regular villager.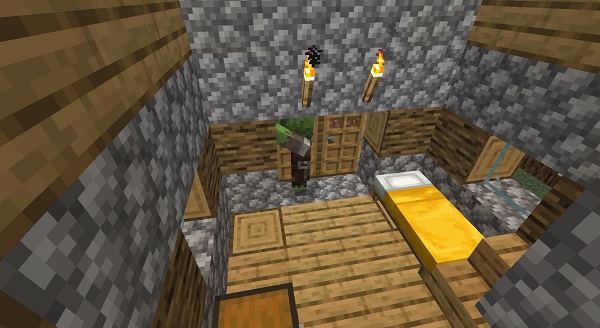
Turn a Zombie Villager into a Regular Villager
Once you have trapped a zombie villager, follow these steps to cure it and turn it into a regular villager:
1. First, throw a splash Potion of Weakness onto the zombie villager. If you do it correctly, small potion effects will start flying around it.

2. Then, equip a golden apple and feed it to the zombie villager. The zombie villager will start shaking violently, and new particles will come out of its body.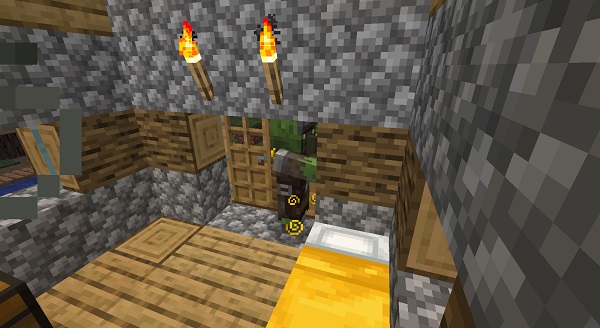
3. While the curing is going on, the zombie villager gains a temporary strength boost and becomes extremely dangerous. So, it's best to leave it alone for a few minutes until the villager is ready.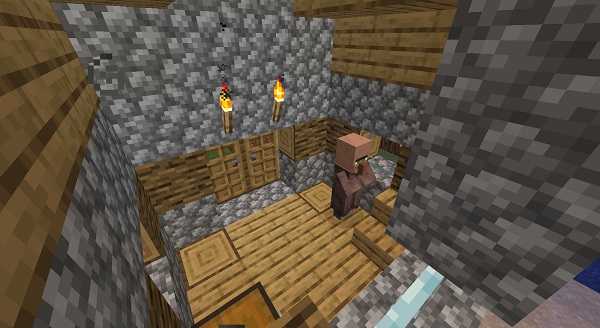
🎯Alternative Method to Apply Weakness: Tipped Arrows
Since the Weakness effect is essential for the curing process, you need to apply it before feeding the zombie villager a Golden Apple.
One of the easiest ways to apply Weakness without brewing a potion is by using Tipped Arrows of Weakness. Here’s how:
🔨 Crafting Tipped Arrows of Weakness
- Obtain a Lingering Potion of Weakness (this does require brewing but only once).
- Place the Lingering Potion in a crafting table with arrows to create Tipped Arrows of Weakness.
🏹 Using the Arrow
- Equip a bow or a crossbow.
- Shoot the zombie villager with the Tipped Arrow of Weakness.
- Once the Weakness effect is applied, quickly feed it a Golden Apple to begin the curing process.
🔹 Pro Tip: Use a dispenser loaded with the tipped arrow to safely apply the effect from a distance.
How long does a Zombie Villager Take to Cure?
Once the cure begins, the zombie villager takes up to 5 minutes on the Java edition and up to 2 minutes on the Bedrock edition to convert. If you don't want to wait that long, you can place beds and iron bars around the trapped zombie villager. However, this mechanic will only decrease the time by a mere 10%. It's just more convenient to be patient.
In case you are wondering, the zombie villager won't despawn while it's being cured. You don't have to stick around to see the entire curing process. Your presence doesn't even affect the process. So, it's much better if you just roam around the rest of the village while the cure takes full effect.
Do Cure Villagers Keep Their Jobs and Items?
When a zombie villager turns into a villager, all the armor and tools it was initially holding disappear. You can't obtain or pick them up. However, if the villager had a job before turning into a zombie, the same job reapplies once it turns back.
If the zombie is a baby zombie villager, it will become a normal baby villager when the cure is complete.
Benefits of Curing A Zombie Villager
Alright, let's talk about the elephant (or should I say zombie?) in the room - is all this effort actually worth it?
Between hunting down golden apples and brewing weakness potions, curing a zombie villager isn't exactly a simple hobby. But before you write it off as too much hassle, let me tell you about the benefits these grateful ex-zombies offer.

Here are all the benefits you get by curing a zombie villager in Minecraft:
- 💎 Trading Discounts: If your zombie villager has a profession, it will give you amazing trading discounts for saving their life.
- 🏠 Village Discounts: When you cure a zombie village inside a village, it affects all the villages around you. This leads them to give decent trading discounts, but they are nowhere close to the discounts offered by a cured villager.
- 🛡️ Stop the Spread: By saving the life of one villager and stopping them from turning into a zombie, you also prevent other villagers from turning.
Frequently Asked Questions on Curing Zombie Villagers
Can you cure zombie villagers in easy mode?
You can cure a zombie villager in any difficulty of Minecraft. However, being in the hard mode ensures that you get a zombie villager every time a zombie attacks a villager.
Why is my cured villager not giving discounts?
If the zombie villager you cured didn't have a profession, it will not offer any trading discounts. The discounts also disappear if you cure the zombie villager too far away from the village.
How many times can a villager be cured?
Generally, you can cure a zombie villager up to 5 times to get trading discounts. However, many other popular Minecraft SMP servers limit this mechanic for more challenging gameplay.
Wrapping Up on Curing a Zombie Villager in Minecraft
Now that you know how to cure a zombie villager in Minecraft, it's time to save a village and unlock great trades. But do keep in mind that you have to deal with other hostile mobs of the night before trapping the zombie villager.
So, make sure to create a diamond sword in Minecraft for some unpredictable situations.
If you plan to trap and cure multiple zombie villagers, then Overworld might be a good spot altogether. You should create a Nether portal in Minecraft and move your hostile friends to the Nether dimension for easier control.
Either way, it's time for you to go zombie hunting and start exploring!